• About Us
  • Contact Us
  • Privacy Policy
  • Terms of Use
Thursday, May 8, 2025
Texillo
  • Home
  • Business
  • Tech
    • Video
  • Health
  • Law
  • Life
    • Personal
    • Buzz
    • Celebs
  • Shopping
  • Animals
  • Sports
No Result
View All Result
Texillo
No Result
View All Result
Advertisement Banner

How to Set Up a Tattoo Machine for the First Time

logicaldot by logicaldot
May 26, 2022
in Life
0
Set Up a Tattoo Machine

Know Your Tattoo Machine

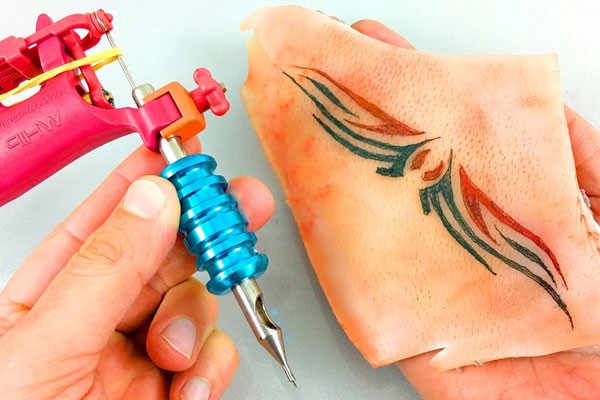
I am not going to beat around the bush when it comes to the machine: If your tattoo machine is not set up correctly, or if the points are not maintained for a good connection, then you are going to have a hell of a stressful time.

In other words, you can’t tattoo well if you haven’t mastered the basic mechanics of your machine. In this tutorial, I will tell you how to set it up correctly and illustrate the instructions with pics of a tattoo liner I use. If you have any questions about setting up your liner after this lesson, please leave a comment. I am a licensed tattoo artist and will gladly respond to any questions you might have.

How to Set Up Your Machine for Lining

When setting up your tattoo machine, there are a few things to know. Below are the steps you need to take when you first pick up your machine and power on.

1. Check the width of your contact screw and front spring.

For machines used to line, the point on your contact screw and front spring should be a dime’s width, no matter what. Most people learn to eyeball this, but if you literally have to put a dime in there to get it perfect, then do it!

Your line work can make or break tattoo care, so make sure that width is set correctly!

2. Open a needle or tube.

Next step is opening your tube. Whether it’s disposable or autoclaved, it should be packaged. If this is a step you missed then stop, because you just don’t want to risk taking a chance with dirty equipment. Using the best, safest equipment, such as envy tattoo needles, is essential. 

3. Inspect the tip.

Check that packaged pre-sterilized needle for any burs or imperfections. Look to see if there are any bent needles in the grouping. Burs and bent needles will cause the skin to bleed more and the ink will not flow correctly, potentially causing complications and scar tissue to form. If you see any burs or bends, then discard that one and open another tube.

4. Insert the tube into the machine.

  • So now that you have the needle in the tube, you are ready to insert the tube into the machine’s tube slot. Make sure to slide it up far enough so that you can semi-tighten the wingnut that attaches the tattoo tube and machine together.
  • Now you want to turn that eye loop of the needle to the left, and then insert the armature bar nipple. This insures that you put the needle on the armature bar correctly. If you didn’t, you will notice that no ink is really going into the skin when you are tattooing, and you will also see a lot more blood. Pay attention to this detail.
  • Next, press down on the armature bar to guide the tip of the needle out of the end of the tube. This helps you determine how far out you need to let your needles hang so you can get the right depth set to penetrate the skin. As a rule of thumb, let the tip of your needle jut out on its own about 1/16 of an inch. . . the stroke of your machine should do the rest. Your needle should never go more than 1/8 of an inch deep into an average person’s dermal layer.

If you’re not sure you have this right, then don’t tattoo on skin. Tattoo on a gourd or melon instead. The melon will give you practice and a better visual test of exactly what you need to do with your settings.

5. Grab two rubber bands.

Next thing to do is slip two rubber bands around your tattoo machine and the needle. Make sure the rubber bands are placed evenly apart, as this will help distribute equal pressure to the needle and stabilize any wobble the needle has inside the tube, creating a clean, solid line when tattooing.

6. Attach your clipcord.

Next, it is time to attach your clipcord. Look at the photo below to see exactly what your machine should look like when set up.

Okay, so you have pre-tuned your tattoo machine by setting the contact point screw and front spring to a dime’s width. You have inspected and inserted your needle. You have your armature bar nipple in place making sure the eyeloop to the needle is facing your left hand. You’ve attached the rubber bands and clipcord. Congratulations, you’ve set up your machine properly.

Advertisement Banner
logicaldot

logicaldot

Texillo

We bring you the updates related to tech and gadgets. In depth articles on business and tech topics are posted on daily basis.

[email protected]

Follow Us

Recent News

Navigating the Complex World of Taxes: Why a Tax Lawyer Could Be Your Best Ally

Navigating the Complex World of Taxes: Why a Tax Lawyer Could Be Your Best Ally

April 30, 2025
Understanding the Role of Bupropion for Anxiety: A Comprehensive Guide

Understanding the Role of Bupropion for Anxiety: A Comprehensive Guide

April 17, 2025

Categories

  • Animals
  • Business
  • Buzz
  • Celebs
  • Education
  • Entertainment
  • Fashion
  • Health
  • Home Improvement
  • Law
  • Life
  • Personal
  • Pets
  • Shopping
  • Sports
  • Tech
  • Travel
  • Video
  • About Us
  • Contact Us
  • Privacy Policy
  • Terms of Use

© 2021 All Rights Reserved.

No Result
View All Result
  • Home
  • Business
  • Tech
    • Video
  • Health
  • Law
  • Life
    • Personal
    • Buzz
    • Celebs
  • Shopping
  • Animals
  • Sports

© 2021 All Rights Reserved.